Reading data from MongoDB and displaying the output
The following job will demonstrate a simple routine to read data from a MongoDB collection and display it on the console within Talend Studio. In addition, it will show the usage of an external file to populate context variables.
Contents
Dropping and Linking Components:
Creating the Job:
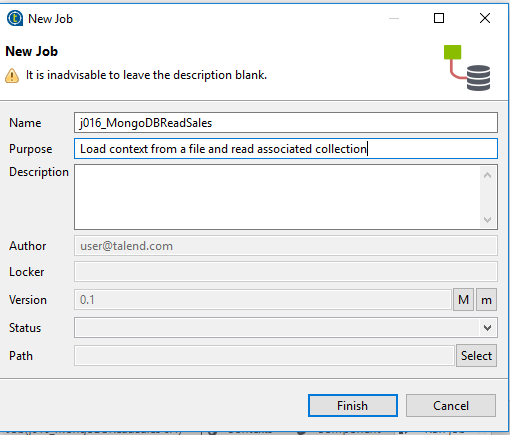
Create a new job by right clicking on Job Designs in the repository. Name the job j016_MongoDBReadSales and give it a purpose. The description can be left blank for now but in general use some meaningful content should be added here to assist with documentation.
Dropping and Linking Components:
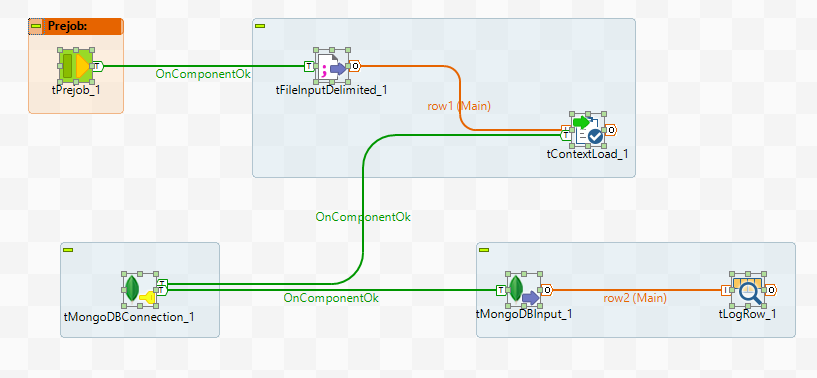
- Add tPrejob, tFileInputDelimited, tContextLoad, tMongoDBConnection, tMongoDBInput and tLogRow components to the design workspace either by selecting from the pallet or by typing the start of the name on the canvas and selecting from the drop-down list that appears.
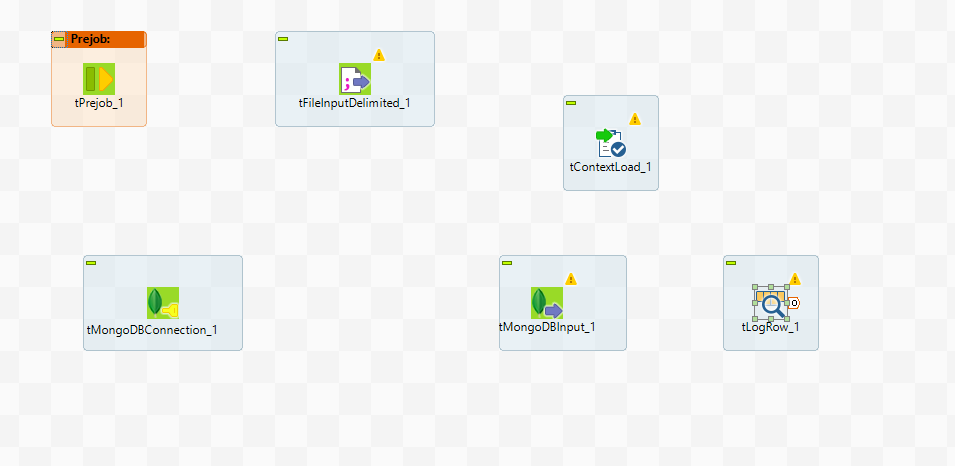
- Right click on the tPrejob component, select Trigger then On Component Ok, move the cursor over the tFileInputDelimited component and click the left hand button when the cursor changes from a plug with a no symbol to the just the plug graphic.
![]() There are two ways to create a row between components in the next step we will describe both and this can be applied to all future steps although only a single method will be described.
There are two ways to create a row between components in the next step we will describe both and this can be applied to all future steps although only a single method will be described.
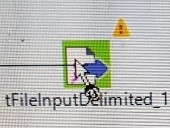
- Either Right-click on the tFileInputDelimited component and select Row > Main. Then drag it onto the tContextLoad component and release when the plug symbol shows as above or click on the tFileInputDelimited to select it, then click and drag the handle that appears on the left hand side of the component over the tContextLoad .
- Right click on the tContextLoad component, select Trigger then On Component Ok, move the cursor over the tMongoDBConnection component and click the left hand button when the cursor changes from a plug with a no symbol to the just the plug graphic.
- Repeat the above step to create an On Component Ok trigger between tMongoDBConnection and tMongoDBInput.
- Right-click on the tMongoDBInput component and select Row > Main. Then drag it onto the tLogRow component and release when the plug symbol shows. The job should now look similar to below.
Renaming the Components:
Clarity of the operations is an important factor in enhancing the maintainability of the process. Giving each component a label that reflects purpose provides an instant visualisation of the task.
![]() Often this stage is left until last but a better practice is to do things up front so there is less chance of it being left out.
Often this stage is left until last but a better practice is to do things up front so there is less chance of it being left out.
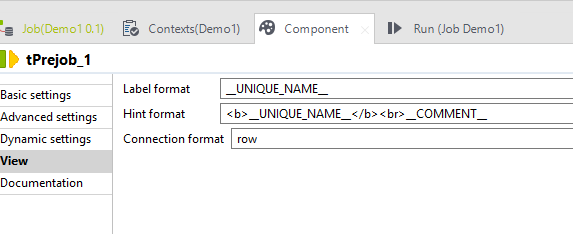
- Click on the tPrejob component then select the Component tab in the View Pane and click the View option from the menu on the left-hand side.
![]() A lot of on-line documentation and examples describe this process but suggest simply overwriting the component name with the description. The problem here is that modifications are made only to the label and not the component itself. Any log entries will refer to the component name and since there is no instant visual link it may be necessary move through several components to identify the source. The larger the process becomes the more exacerbated the issue. A better practice is to both add a meaningful description and maintain a visual link to the component and this process is described below.
A lot of on-line documentation and examples describe this process but suggest simply overwriting the component name with the description. The problem here is that modifications are made only to the label and not the component itself. Any log entries will refer to the component name and since there is no instant visual link it may be necessary move through several components to identify the source. The larger the process becomes the more exacerbated the issue. A better practice is to both add a meaningful description and maintain a visual link to the component and this process is described below.
- In the Label Format field prepend the expression <b>Initialise Routine</b><br> to the contents. In the design workspace you will notice that the tPrejob component now has 2 lines of text underneath with he top line being a description in bold and the original component name on the second line. To centre align the name value place the cursor after the <br> tag in the Label format field and use spaces to visually align the text.
- Repeat the process on the other components adding descriptions shown in the following table:
| Component Name | Description |
| tFileInputDelimited_1 | Read Context Info File |
| tContextLoad_1 | Load File Data To Context |
| tMongoDBConnection_1 | Connect logging Database |
| tMongoDBInput_1 | Get Documents |
| tLogRow_1 | Log Output |
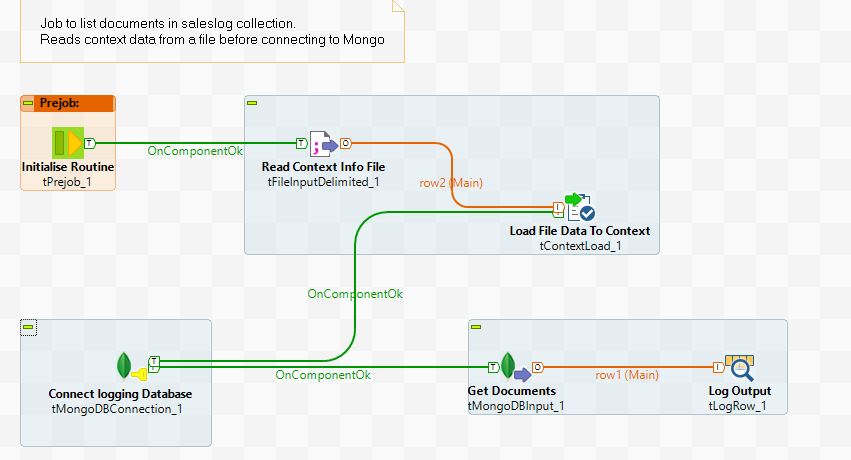
- Finally add an annotation to the job describing it’s function by selecting the Note component from the Misc component group in the Palette and dragging into the Design Space. Modify the text to
“Job to list documents in saleslog collection.
Reads context data from a file before connecting to Mongo“
then drag the width of the component out until the full description appears. Place the note somewhere at the top of the screen.
The job should now look like the image below:
Adding the context
- Click the Contexts tab in the View pane below the Design Surface.
Select the green plus icon from the bottom left hand corner to add a new row.
- Enter the value MongoCollection in the Name field and ensure the Type is String.
- Repeat for the MongoSearch, MongoNode and filename fields, all String type.
- Enter the location of the file containing the context values into the Default Value field of the filename entry.
The completed details should be similar to below, the value for filename may differ depending on the name and location of the file used.

Configuring Components:
- The tPrejob component requires no further configuration following the label change.
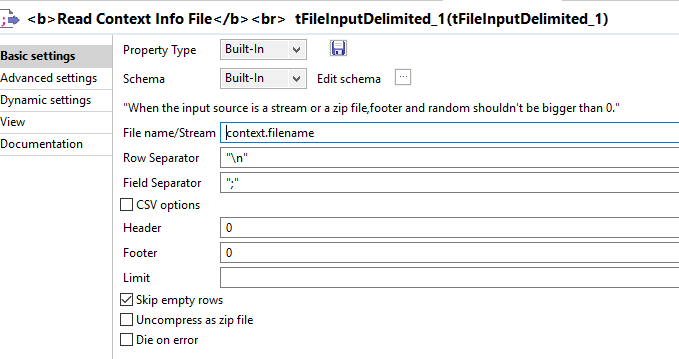
- Select the tFileInputDelimited component then click on the Component tab in the View pane.
- Click the ellipsis next to Edit Schema to bring up the schema editor then add 2 String entries named key and value the list, accepting all defaults.
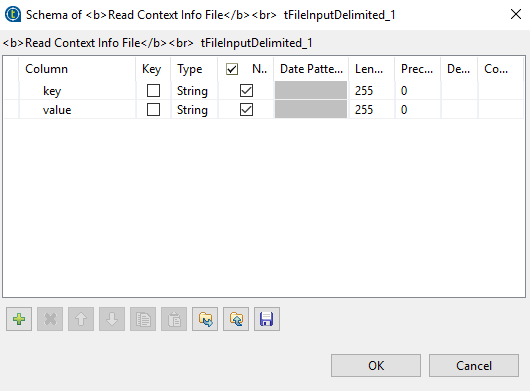
- Click OK to close the schema editor and say yes to propagate changes.
- In the File name/Stream field type con then press the control and spacebar keys simultaneously and select context.filename from the list.
- All other settings can be left as the default values.
- No further configuration is necessary on the tContextLoad component provided the schema changes were propagated in step 4. This can easily be checked by opening the schema editor and checking it matches the schema of the tFileInputDelimited component.
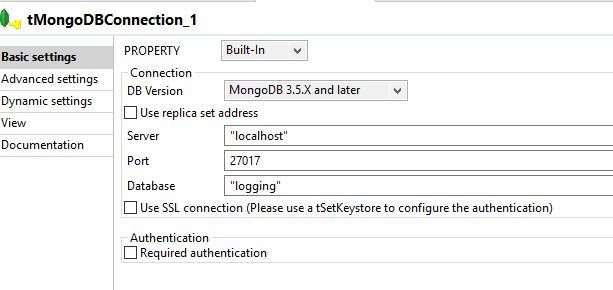
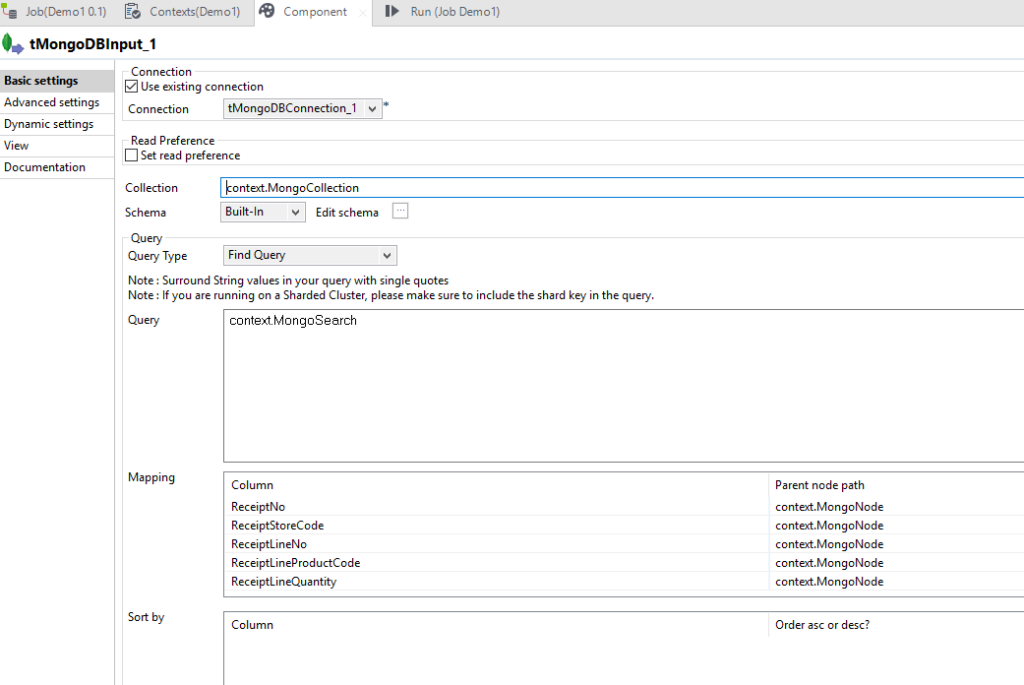
- Select the tMongoDBConnection component and the Component tab in the View pane.
- Select MongoDB 3.5 X and later from the DB Version field. Set the Server to be “localhost” and Database as “logging”. The port remains the default 27107 unless a custom installation of MongoDB has changed this. All other entries can be left as default.
- Select the tMongoDBInput component and the Component tab in the View pane.
- Click the ellipsis next to Edit Schema to bring up the schema editor then add 5 Integer entries named ReceiptNo, ReceiptStoreCode, ReceiptLineNo, ReceiptLineProductCode and ReceiptLineQuantity to the list, accepting all defaults.
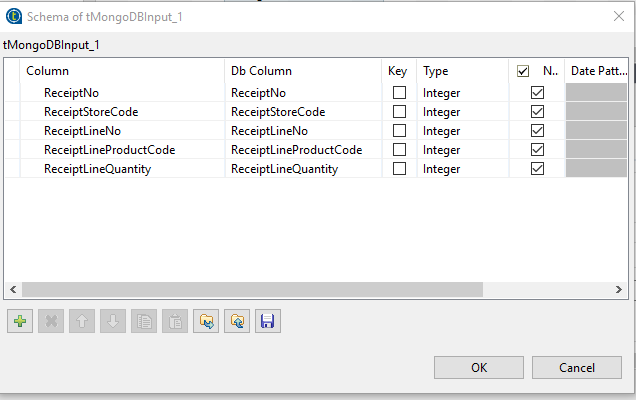
- Click OK to close the schema editor and say yes to propagate changes.
- On the Component tab select the Use Existing Connection checkbox and the value tMongoDBConnection_1 will appear in the Connection field.
- In the Collection field type con then press the control and spacebar keys simultaneously and select context.MongoCollection from the list.
![]() It is possible to just type in a value for the field, but the lookup process helps reduce the risk of transcription errors.
It is possible to just type in a value for the field, but the lookup process helps reduce the risk of transcription errors.
- Set Query Type to be Find Query.
- In the Query field type con then press the control and spacebar keys simultaneously and select context.MongoSearch from the list.
- In the Mapping section the five schema fields will be listed. For each line enter the Parent node path field, type con and press the control + spacebar keys simultaneously and select context.MongoNode from the list.
- Select the tLogRow component and the Component tab in the View pane.
- Press Sync columns to ensure the Mongo schema has been propagated
- In the Mode section select the Table radio button

All components have now been configured.
Running the Job:
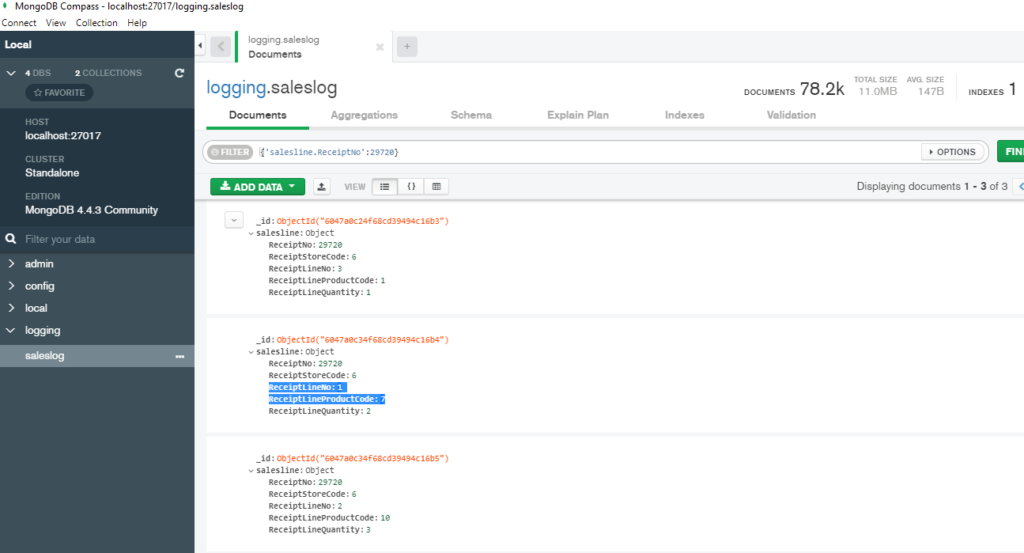
For this test the data entered in the video tutorial example will be used and this is displayed in Mongo DB Compass as shown:
The contents of the context configuration file MongoContext.txt is shown below. The search value can be replaced by any valid query expression for the collection.

When the job runs the context information is extracted from this file and loaded into the corresponding context variable.
![]() Note that the filename context variable is not set by this file and uses the default value defined in studio. This type of mixing and matching is quite acceptable indeed context values can be assigned from multiple sources both local and repository based.
Note that the filename context variable is not set by this file and uses the default value defined in studio. This type of mixing and matching is quite acceptable indeed context values can be assigned from multiple sources both local and repository based.
To run the job within Talend Open Studio (TOS) select the Run tab from the View pane then click the Run button. The job will be built by Maven and ran immediately assuming no errors are detected. Results are displayed in the console window of the Run tab.
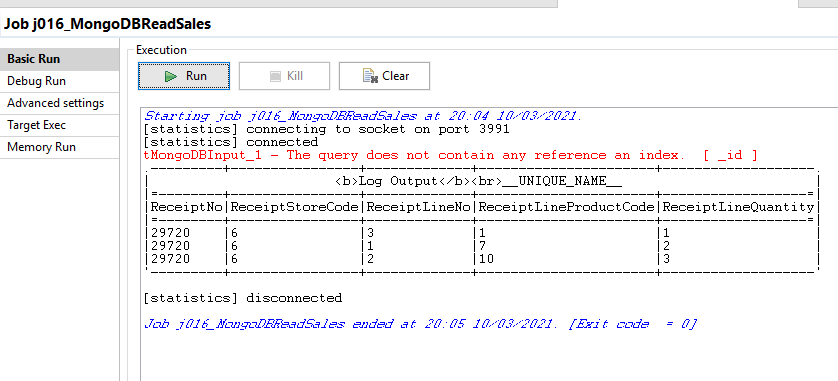
The Mongo data is displayed as expected. To change the data selected a different valid JSON expression can be used in the MongoSearch entry within the MongoContext.txt file and the job re- ran.